Viennese Waltz Made Easy 
21 March 2016
A special thanks to Nyancy for proposing this idea on .
Viennese Waltz is perhaps the most difficult dance to learn. Most beginners will approach it like Slow Waltz, but the amount of rotation and speed of music can prove fatal within just a few steps. On the other hand, many higher level dancers will agree that Viennese Waltz is one of the easiest dances. How can this be? How can a dance be so hard to learn, but then magically become one of the easiest dances, even though it is so fast? Read further, as we unlock the secrets of Viennese Waltz made easy!
1. Change the Way you See the Floor
For the other four Standard dances, the floor is rectangular, but not in Viennese Waltz. In Waltz, Tango, Foxtrot, and Quickstep, we move down the Line of Dance, into a corner, and come out of the corner to find ourselves along a new Line of Dance, but in Viennese Waltz, you must think of the floor as one big oval. The reason for this is that it takes a lot of time to turn a corner, and if you try to make it a sharp turn, you will likely run off the floor or trip. Instead, feel that you are dancing around one long Line of Dance which is curved around a center point in the middle of the floor. About 2/3 of the way down the long side, the Line of Dance begins to curve and cut out the whole corner. Along the short side, the Line of Dance is just one large curve, moving back into the long side. If you are at a corner, you should think of Line of Dance not as you would in Waltz or Tango, but as being perpendicular to the line between you and the centre of the circle.
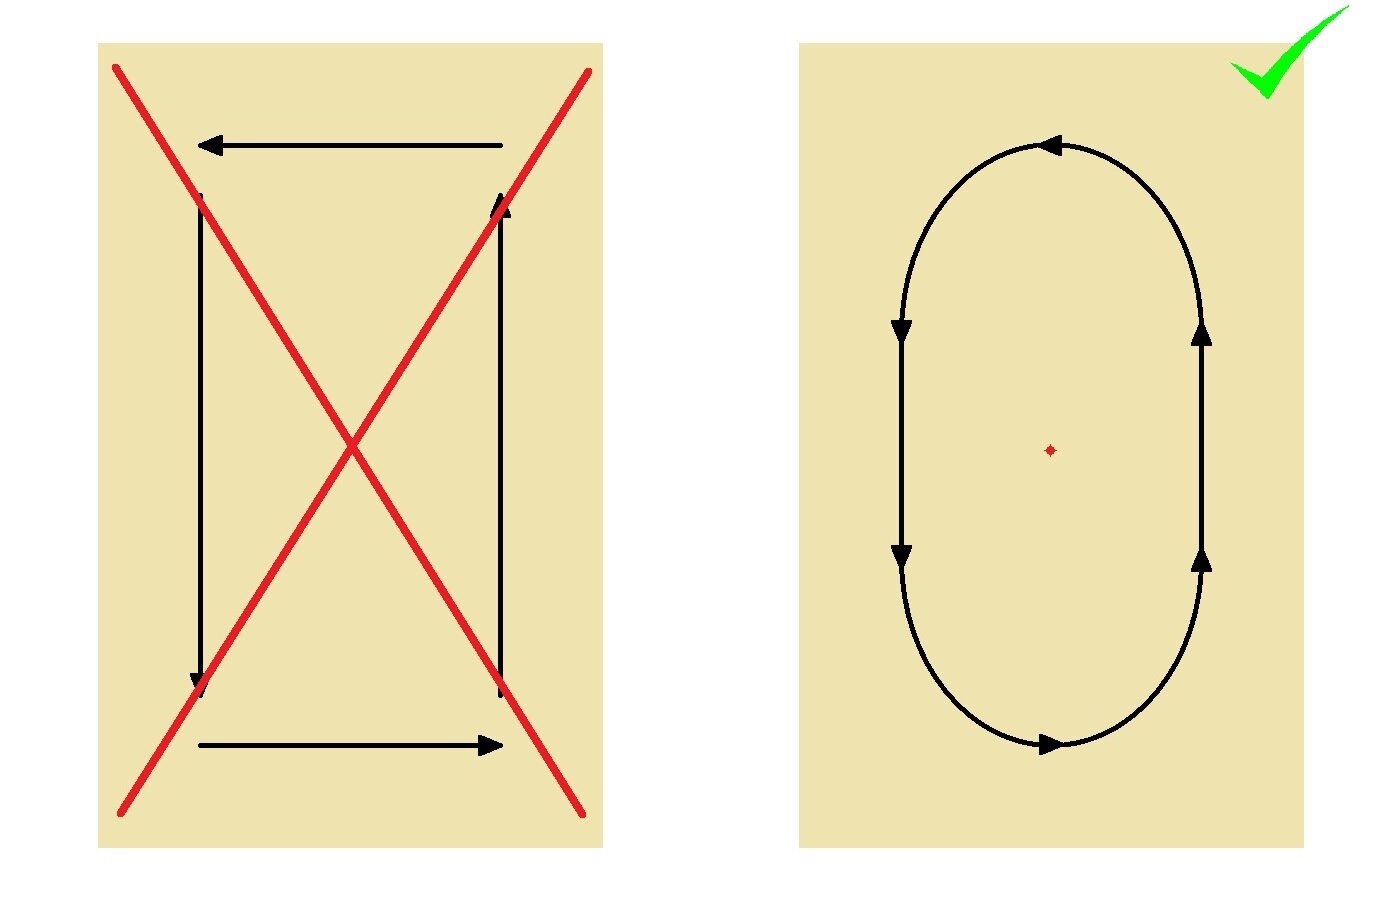
Also, as depicted above, make sure there is enough space toward the outside of the circle so that you can veer a little outward and avoid a crash or congestion if someone else stops on the floor.
2. Know your Directions and Alignments
Viennese Waltz is simple in that it only has nine figures, and three of those you probably won't be dancing until you're and advanced dancer (i.e. Reverse Fleckerls, Contra Check, Natural Fleckerls). This means that you have the following figures in your repertoire:
| 1 | Natural Turn |
| 2 | Reverse Turn |
| 3 | Forward Change (Natural to Reverse) |
| 4 | Forward Change (Reverse to Natural) |
| 5 | Back Change (Natural to Reverse) |
| 6 | Back Change (Reverse to Natural) |
While those three more advanced figures mentioned above just spin in the middle of the room, these six basic figures are what move you around the floor, and there are some key similarities between them that will make dancing a lot easier if you understand. Remember that LOD is a curve in Viennese Waltz, so DW and DC must be adjusted accordingly.
| 1 | Every single step should travel LOD or almost LOD.* |
| 2 | Natural Turns always begin and end aligned toward DC. Before you step forward into a Natural Turn, you should be facing DC. Before you step back into a Natural Turn, you should be backing DC. |
| 3 | Reverse Turns always begin and end aligned toward DW. Before you step forward into a Reverse Turn, you should be facing DW. Before you step back into a Reverse Turn, you should be backing DW. |
*The person going backward on beat 1 will step slightly out of the way, but that step is essentially still taken down LOD. In a Reverse Turn, Man's step 2 (Lady's step 5) will also step slightly out of the way to allow for the following step to cross in front, but again, this step is still essentially taken down LOD.
3. No Rise and Fall
It is said that Viennese Waltz should have less Rise and Fall than Tango. Most dancers who learn Viennese Waltz already have experience with Waltz, and so they want to put a lot of Rise and Fall into it. Look at this video of Arunas and Katusha, currently the Professional Standard World Champions, dancing Viennese Waltz. Notice that there is a slightly dropping of the body on beat 3, and a very gradual Rise over steps 1 and 2.
Although we must admit that there is a very slight Rise and Fall in Viennese Waltz, the dancer should nevertheless think of the dance as being flat. Rise and Fall will come naturally, and trying to put in slight Rise and Fall too often results in way more than is desirable. Keep your Viennese Waltz flat.
"But Cyril, the technique of Viennese Waltz says to Rise at the end of 1."
Again, if you think about rising, you will rise too much. With the speed of the music, there is no time for a real Rise and Fall. Don't do it!
4. Travel, don't Turn
To the untrained eye, Viennese Waltz appears to be a Man and a Lady spinning around each other endlessly, but if you think of Viennese Waltz as rotational, it will be very difficult to dance. Ask any advanced dancer, and he will tell you that Viennese Waltz should feel like there is no rotation at all. The problem for many is that they don't understand how to get around their partners, so they try harder and harder, resulting in a lot of rotation and making the dance tough and exhausting. But instead of trying to get around your partner, try travelling through your partner.
Let's say we are doing a Natural Turn. We begin the the Man facing DC and the Lady backing DC. On step 1, 1/8 of a turn is made just by placing the foot down LOD. The Man will step straight down LOD, while the Lady will step slightly to the left to allow the Man to pass. Even though the Lady steps slightly leftward, her step should essentially be down LOD, and not taken too far to the left. From there, both partners will take the following step straight down LOD. Since that is a side step, the Man is now backing centre, while the Lady's body is facing centre, with her right toe pointing between the Man's feet. Finally, when the feet close, they reach their desired alignment of Man backing DC and Lady facing DC. From there, the Man will do what the Lady just did and vice versa.
Notice how the majority of that explanation had to do with travelling, and not turning. As long as you travel in the right direction and are aware of your partner, the turn will come naturally. Practice this first to slow music, and then speed it up as you grow accustomed to thinking about travel instead of turn.
5. When to Dance a Natural Turn vs. a Reverse Turn
It is always easier to make less turn than to make more turn. Dance Natural Turns and make slightly less turn on each step, and you will notice you begin to curve to the left over time. Do the same thing with Reverse Turns and you will notice you begin to curve to the right. The only way you can reverse that curve is by doing more turn than normal on each step, which is very very difficult. This is why curving a Reverse Turn around a corner (which always curves left on the dance floor) is very difficult, yet curving a Natural turn around a corner is easy. My advice is this: When you approach the short side and you know you are going to have to curve a lot, dance Natural Turns. When you are going down the long side on a straight line, do Reverse Turns.