Rise & Fall in Waltz: Part 3 
28 September 2016
This is the third installment in the Rise and Fall series, where the specifics of different types of Rise and Fall in Waltz are examined in detail. Click here for Part 1, which covered the most basic type of Rise and Fall, found in Natural and Reverse Turns. Click here for Part 2, which covered the type of Rise and Fall found in Chasses ended with feet apart. Today we will discuss a third type of Rise and Fall which is a hybrid between the two.
The Traditional Technique
This type of Rise and Fall is used for figures taking three steps, where none of the steps consist in closing of the feet, and yet the Waltz feel needs to be preserved, such as the Whisk, the Outside Change, and the Hover Corte. These figures have the following Rise and Fall:
Commence to Rise at the end of 1
Continue to Rise on 2
Up on 3, Lower at the end of 3
You can think of this rise as a combination of the Rise and Fall of a Natural Turn and a Chasse. It is like a Natural Turn in that the entirety of the Rise is completed by the end of step 2, but it is like a Chasse in that you land high on the toes with feet apart on the final step, and then lower at the end of the figure as you bring your weight fully onto the foot.
In Depth Explanation
Let's look specifically at the Rise and Fall for steps 1-3 of a Whisk as a Man, though the Lady's Rise and Fall is essentially the same. Remember that this is the Rise and Fall used in almost every Waltz figure when three steps are taken without any closing of the feet (the exception being steps 1-3 of the Basic Weave). Below is an in depth explanation of the Rise and Fall for each beat of music. Key elements have been excluded, such as Turn, and this explanation focuses only on Rise and Fall.
Commence with weight on the RF, with LF free, at the lowest part of your Rise and Fall, having danced 4-6 of a Reverse Turn.
| 1 | With weight on the ball of the RF and commencing to release the left heel, commence to send the body weight and LF forward with the ball of the foot in contact with the floor, extending the R leg and then step Heel to Toe, with weight firmly split between the two feet, and strong pressure into the ball of the back foot. |
| & | Flex the L knee strongly to bring the body over the LF, rolling through the Toe of the back foot, and commencing to rise very slightly as the body arrives over the foot. |
| 2 | Swing through the LF, straightening the L knee and continuing the rise smoothly. Place the RF to the side and slightly forward high on the Toe, with weight split evenly between the two feet. |
| & | The LF comes under the body, passing the RF as weight is taken fully onto the RF |
| 3 | Land with the LF crossed behind the RF high on the Toe (i.e. as high on the ball of the foot as possible), with weight split evenly between the two feet. |
| & | Lower on the LF, gradually lowering the heel to the ground as full weight is taken onto the LF and the R knee is released, preparing for the following step. |
What it should Look Like
This graph shows where you should be in your Rise and Fall at any point in the Whisk. Notice that even though step 3 is listed as Up, it is lower than the end of step 2. Read on below to see why that is.

Commence to Rise at the end of 1
One of the most common faults in beginners is that they lower on step 1, but in the graph above, it should be clear that you should neither rise nor fall on step 1, and it is only at the end of 1 that you even commence to rise. This is because the extension of your leg should be powering you to move forward, not up or down. At the end of the first step, when your weight has gotten over your front foot, you just begin to experience rise.
Continue to Rise on 2
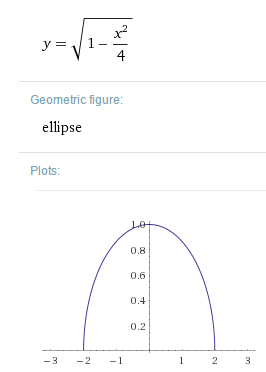 By the time you reach step 2, your legs should be fairly straight. What causes you to rise between steps 2 and 3 is the closing of the feet - that's it. Think of it like this: your legs and the floor form a triangle. When you close your legs and stand with feet together, your triangle is very skinny and very tall. If you can do the splits, then your triangle is very wide and very short. As you go from one extreme to the other, Rise occurs. In Waltz, we thankfully don't have to do the splits, but we do Rise in the same way just by virtue of closing our legs. The exact amount of Rise (for all you math and physics buffs out there) is represented by the equation to the right. For the rest of us less math-savvy dancers, this means that the Rise generated by closing our legs is a smooth rise with the appearance of a plateau on top for a split second, which is exactly what we want in Waltz.
If you compare the graph above to that of Part 1 and Part 2, you will see that the rise up to this point is most like a Chasse, music wise, because the highest part of the Rise happens on beat 2&, and not on beat 3 as in the Natural Turn. That said, it is different from a Chasse in that on beat 2& in a Chasse there is a closing of the feet, whereas here there is only a passing of the feet at this time.
Up on 3
This is the weird part. The Rise here is stated as Up, but looking at the graph, it is lower than the previous step. The reason for this is because you should be trying to stretch upward at this point with every fibre of your being: the ankles, the knees, the body, and the eyebrows should all be stretched up to the maximum here (okay not the eyebrows), but nevertheless, because your feet are apart, your shoulders are physically closer to the ground than when your feet were together. The reason this isn't expressed as commence to lower or something is that you shouldn't be trying to lower at all. If you were to try to lower on this step, you would plough into the ground. The Up you feel during this step should feel more like forward and diagonally upward, as if you are neck deep in a swimming pool, stepping over a large trench that you can barely reach the other edge of without submerging your chin.
A distinction has to be made here, as well, between the Whisk and the Outside Change or Hover Corte. In the Whisk, one foot crosses behind the other, so the step cannot be very large, whereas in other figures the feet may spread naturally. The more the feet part, the greater the natural consequential lowering will be. You can see that between beat 2& and 3 there is a shallow lowering, which is what would be felt in the whisk, but it is possible this lowering could be more pronounced if dancing the Outside Change.
Lower at the end of 3
This means that as you take full weight onto the new leg, your heel should lower and your knees should bend. When you landed on step 3, you were on the balls of both feet with both knees straight. Now, as you take full weight onto that step, the knees bend. This lowering action is the drive behind your next movement, and practicing this will make your next figure more powerful.